Pergola Posts

Pergola posts can make a big difference to the look and feel of your pergola, so let's think about:
- Post sizes to give pleasing proportions
- Different types of support to anchor the post to the ground
- Whether to use rough sawn timber or planed timber, and what we need to think about to make that decision
- Powder coated pergola kits
- Using different colours to enhance the pergola and take it to a new level.
We'll go with post sizes first, because after all size does actually matter!
How To Get Your Pergola Post Size Right
The size of your pergola posts in relation to the main rafters or beams and the rafters sitting on top of these beams can make a huge difference to the overall look of your pergola.
To achieve a balanced, professional-looking pergola, it's a good idea to think through the size of your timber carefully beforehand with a view to matching the 'visual weight' of your posts to the thickness and span of your rafters. A structure with heavy 6"x6" posts but thin 2"x4" rafters will look 'anaemic' or unfinished, while heavy rafters on 4"x4" posts can appear top-heavy and unstable.
This pergola kit has 4" x 4" posts with 2" x 6" rafters/support beams. It looks perfectly proportioned. The bases have a 'foot', making the pergola look grounded and stable.

The bigger your posts, the bigger the beams and rafters need to be. So, for example, if you'd like to build a delicate structure to support relatively light climbing plants or for use with some small arbours and entrances, and don't want to lift heavy wood, then a 3" x 3" post is fine.
For the true beginner this size is manageable. It might have rafters measuring 1" x 4", 1" x 6" or 2" x 4". To move up to a 2" x 6" rafter, 3"x3" posts become a little spindly, and the whole thing will look much better with a 4" post.
4" posts can look more substantial and can be used for similar structures in the garden. Just remember to increase the size of the rafters. A reasonable rafter size for 4" x 4" posts would be 2" x 4", 2" x 6" or even 2" x 8".
If you have the courage and strength to make a bigger pergola, you might go for a 6" x 6" post, or for a large luxury pergola like this one, an 8" x 8" post. Rafters for these would be 2" x 8" or 2" x 10" or even 2" x 12". Beams are often doubled up on these bigger pergolas. They look really substantial and have a definite wow factor.

The free pergola plans can be used for these bigger structures, but you're definitely going to need some help!
Purlins sit on top of the rafters and are used decoratively or to add more shade. These purlins also need to increase in size the bigger the pergola becomes.

Once you have decided on the size of your pergola timber, think about how you are going to fix the structure to the ground. There are several options depending on the nature of the surface.
Anchors For Your Pergola Posts
Bolt-down bases are best for concrete, paving or decking. These flat steel plates feature a "U" or "box" sleeve. They are secured using expansion bolts or lag screws, keeping the wood elevated to prevent rot.
Also for use on paving, a newer style is the elevated post anchor, which takes the post well away from the ground and can be adjusted to different heights. Alan used them to raise the posts from the base of his patio. They are definitely not going to sit in a pool of water!

When your pergola is placed over a paving square, the post anchors can sit either on top of the paving or outside it in soft ground. For the latter, and for any anchor that fits in the ground, look at the ideas below.
You can see all the different types of post anchors here. See which one fits your situation the best. There are often different styles of the same thing, for example, with the concrete-in post anchors. Choose which you think will be the easiest for you to install.
Post spikes have long, tapered metal fins and are hammered directly into the soil. They are ideal for smaller structures in firm ground where pouring concrete isn't desired. However, they can be a bit tricky to install, especially if the ground is stony or uneven, as they tend to skew when hitting them into the ground.
If you'd still like to use them for their convenience either use the spike of a crowbar to form a pilot hole in the soil, or dig out the soil, install the anchor in the correct position and then firm the soil back around the anchor spike.
Concrete-in anchors feature a long rebar tail or "H" shape for submerging into wet concrete. Once set, they provide the strongest permanent bond for heavy timber frames. They also come in a style that uses a long screw lengths with a U shape above ground.
Ground screws are large helix anchors that twist deep into the earth, offering high stability in various soil types without the mess of digging. Again, the ground needs to be fairly soft and pliable in order to install these.
Which Timber To Use For Your Pergola Posts
Choosing between rough sawn and planed timber really comes down to whether you’re building something meant to be seen or something meant to do the heavy lifting behind the scenes.
Rough Sawn: Raw & Rugged
Rough sawn timber is exactly what it sounds like—straight from the mill with all the fuzzy texture and saw marks left behind, although if you pick your source and timber carefully, some of it is not bad at all.
It’s the 'workhorse' of the wood world. Because it hasn’t been prettied up, it’s cheaper and slightly thicker, making it perfect for structural stuff like garden fences and rustic pergolas where a few splinters don’t matter and the size is what it says it is. So 100mm post will measure 100 mm.
This type of timber is ideal for pergolas supporting climbing plants, as the focus is on the plants and often very little of the pergola itself can be seen.

Planed: A Smoother Finish
If you’re building a pergola where the focus is on the pergola structure, you’ll want planed timber (often called PAR). It’s been run through a machine to give it a silky-smooth finish and perfectly straight edges. It’s much friendlier to the touch and takes paint or stain beautifully. You pay a bit more for the convenience, but it saves you hours of sanding and ensures everything fits together snugly.
However, there is an important caveat.
Fitting planed timber into post anchors designed for rough sawn wood can be a bit of a 'round peg, square hole' situation. Since planing shaves off about 5mm per side, a standard '100mm' planed post is actually closer to 95mm and has a slightly curved corner. This leaves a loose, wobbly gap inside the anchor.
To fix this, you’ll usually need to use plastic shims or thin wood offcuts to pack the space before tightening the bolts. This ensures the post stays plumb and secure without rattling in the oversized base.
Powder Coated Pergola Kits
Some manufactured pergola kits are already painted in different colours: black, grey, white and ivory are the usual contenders.
It's really important if you want your pergola kit to be very low maintenance and staying looking as good as new to make sure that it has been powder coated. Powder coating makes a metal pergola a very tough maintenance-free structure meaning that you only have to give it a quick wash down to keep it in tip-top condition.
Usually the whole pergola is painted to stop it from rusting. Some kits are unpainted to give a rusty, natural finish. However, I think most of us would prefer something that looked as good as the day it was bought after a quick wipe down. These modern painted pergolas are very popular now because they are almost maintenance free: modern, very sleek and beautiful!
These two have louvred rafters to protect from the rain. Read more about them here.


Trending Colours
Colour can instantly lift a pergola. Painting your pergola posts in soft neutrals feel calm and relaxing, while deep greens or charcoals add drama. A fresh coat highlights the structure, ties it to surrounding plants, and makes the space feel finished, cosy, and intentionally designed without much effort for quiet afternoons and relaxed evenings.
To achieve a relaxed, country feel, avoid high-gloss finishes. Instead, apply a distressed whitewash or soft sage green using a dry-brush technique. This allows the natural wood grain to peek through. Matte textures feel more organic, seamlessly blending your pergola into the garden’s tranquil, living landscape.

Colour Palettes
I've shown three colour palettes here designed to enhance your pergola’s 'relaxed' feel while making your plants pop:
1. The Mediterranean Retreat
Purple wisteria, grapevines, clematis or lavender climbers.
- Post Colour: Warm eucalyptus or muted olive.
- The Effect: Green tones are 'recessive', meaning the posts will visually blend into the foliage. This creates a lush, overgrown look where the structure feels like a natural part of the garden.
- Use a matte finish to avoid harsh reflections that can distract from the delicate texture of the leaves.

2. The Sun-Drenched Coastal
White jasmine, climbing roses (pink/peach) or clematis.
- Pergola Post Colour: Ivory, soft pale grey or sandstone.
- The Effect: These soft neutrals reflect sunlight without the starkness of pure white. They make the vibrant greens of the vines look deeper and more saturated, providing a classic 'shabby-chic' or cottage-garden vibe.
- Apply using a dry-brush technique to let some of the original wood texture show through for a lived-in feel.

3. The Moody Modern
Dark coloured pergolas fit into a much more modern style beautifully. They often stand alone, and the emphasis is on the structure rather than the planting.
Use paint creatively to highlight aspects of the pergola; it doesn't have to mean painting the whole pergola - it could be painting just the rafters, or just the posts with the main beams.
Plant vibrant leaf and petal colours in surrounding pots and planters if you want to keep the structure 'clean', or to grow climbing plants over the pergola if you like that particular look. These colourful plants will create the drama, along with the use of carefully chosen accessories; try accessories and colour palettes out against the pergola colour before making a decision. See which colours lift the area.
- Post Colour: An urban slate grey or deep espresso.
- The Effect: Darker earthy tones create a 'shadow' effect behind the plants, making bright blooms or fiery autumn leaves glow by comparison. This style adds depth to a small corner, making it feel more like a secluded, private sanctuary.
- Darker colours often require less maintenance as they hide dirt and splashes from the garden better than lighter shades.
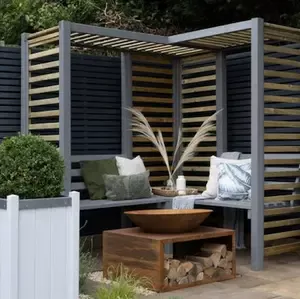
A simple paint colour on the posts and front rafters of this pergola definitely enhance the whole area, particularly the addition of cool grey against the warmer, natural organic wood. Soft furnishings and accessories soften the whole look making it cosy and inviting, while the dark grey privacy fencing behind the pergola sets everything off beautifully.
There is so much you can do to make your pergola unique and special. I hope this has given you some creative ideas!
Recent Articles
-
They're Coming In Thick and Fast This Weekend!
Apr 12, 26 08:29 AM
Even more discounts to savour, this time for trees, with the original 20% off and now another 15% off. If you're looking for a perfectly placed tree this season either to plant in the ground or in a p… -
Fantastic Pergola Offers
Apr 11, 26 10:44 AM
 Exploring fantastic pergola offers, garden bargains and exclusive voucher codes can mean big savings and there are some great ones this month! Take a look.....
 -
Pergola Posts
Jan 17, 26 09:55 AM
 Let's look at some ideas for your pergola posts - post size, post anchors, using rough sawn or planed timber, and trending pergola paint colours.
 Subscribe To My Blog Posts


Advertising Links
This page may contain advertising links earning a small commission, at no extra cost to you. It is my hope these links will help you to make informed and creative choices.
Love Gardening! Ezine
Join the 'Love Gardening!' Ezine and receive garden and landscaping tips, exclusive voucher codes and updates to the website. More...
Recently Released

Pitched Roof Hexagonal Pergola
Other
Pergola Plans

Free Simple Pergola Plans

Attached Lean-to Pergola

Free Raised Bed Plans

Corner Pergola

Hexagonal Pergola

Asian Pergola

Seated Arbour
"The plans were great, very concise, easy to follow and I couldn't have managed without them!" T.
“Well done for a really useful site!” Mike.
Love the templates for the Rafter Tails! Using Design #5. Thanks so much." Laura.
"I love your website! Your entire site is incredible. I was able to get ideas for my pergola, which looks fantastic." Wayne.
Great service. Now all I have to do is build it! Martin.
"Your plans look amazingly comprehensive. I see you are intending putting the plans for the corner pergola on this fabulous site. Could you please tell me when the corner pergola plans will be available to purchase...yours is the nicest design I have seen!" Michelle.
Plants and Seed Offers
Pergola Kit and Accessories Offers
£340 off


Sales & Offers
Beautiful 'Gainsborough' gazebo
Save £204!

See my 'Fantastic Offers' page for more bargains on pergola kits, tools and all things gardening!