How to Grow Pea Shoots

It may look like a bad hair day for my pea shoots, but appearances can be deceptive; boy, are they delicious!
These are great to grow for anyone: kids; 'grow your own' enthusists; or, indeed, anyone who loves the taste, and would like to have a good supply readily at hand!
6 Great Reason to Grow Pea Shoots
- They are, indeed, very tasty...very, very tasty (can feel a ditty coming on! Do you remember that one?)...they're very tasty!
- Look fantastic as a garnish (often used in trendy restaurants, especially those selling Asian food).
- Sometimes difficult to source, and expensive to buy.
- Full of health-giving properties: wonderful phytochemicals and protease inhibitors for the prevention of the big 'nasties'; lots more vitamin C, vitamin A and folic acid than found in many other fruits and vegetables.
- Simple to prepare in salads, soups, juices and garnishes.
- Doing it this way is much easier than growing the full-grown pea.
The first time I sampled pea shoots, I really loved them, and have wanted to grow them ever since. The only way I can describe the taste is 'essence of pea'. Mmmm...
One word of warning though: Never eat ornamental sweet pea shoots (the type that Granny used to grow in her garden) as they are poisonous!
Which Pea Shoots Grow Best?
For my first attempt, I grew four pots of shoots indoors. (It was minus 12 degrees celsius outside. Talk about frozen assets!) I wanted to see how they would fair where it was very warm, in the kitchen, with the Rayburn; in the front room, where the sun shines in the afternoon; in the bedroom, where the sun shines in the morning; and on top of the wardrobe where 'the sun don't shine' at all!
At first, the warm kitchen peas sprouted most vigorously, but, after a while, it was definately the bedroom, with the morning sun that provided the best results (bit like with me, really).
However, after three weeks growing the shoots in various test sites around the house, it was beginning to seem like 'The Day of the Triffids'! Something had to be done.
Because I was meeting friends one night, I took three of the four pots to give to them. They all love these fabulous greens, too. Lots of people seemed interested in growing them and were going to have a go!
Because of the enthusiasm of this small group of people, I decided to show how to grow pea shoots very simply, here on my website, and include it as part of my feature on climbing vegetables.
This method can be used for outdoor containers, too, although this will restrict the growing and harvesting season (the soil and air temperature both need to be warm, otherwise rot will, literally, set in!). The beauty of growing indoors, at least in the cooler months, is that growing pea shoots can be an all year round affair!
Let's get going then...
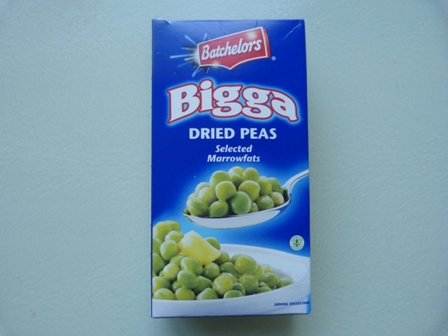
1 Buy Your Peas
Any dried pea will do. I bought these, in a box, for about 50p. Have used about a quarter of the packet so far.
2 Soak the Dried Peas
You can soak them overnight, or, like I did, for three days (to give them a good start), changing the water each day.

3 Add Compost and Sand
Take a container or bucket and add enough compost to fill your pot. Add a little silver sand for increased drainage. (I'm sure it would be fine without the sand, but I always tend to use it to prevent rotting.)

4 Mix
Mix the two together so that the sand is evenly dispersed.

5 Add Crocks
You can use any sort of pot, as long as it has drainage holes in the bottom. Cover the holes with stones, gravel or broken crocks (old pots that have cracked in the frost) so that the water drains through, but the compost doesn't.

6 Fill the Pot
Use a scoop or trowel to fill your pot with the compost and sand mixture. Leave enough room to add an inch layer on top of this.

7 Add Peas
Here are the pea shoots that have begun to sprout. Scatter them over your compost.

8 Plant More Pots
The sprouted peas go a long way! Plant up more pots if you have any sprouted peas left over.

9 Cover
Cover the sprouted peas with about an inch of compost and sand mixture.

10 Put In Container
If you're intending to grow your peas indoors, place the pot in a waterproof container (one without holes in the bottom!).

11 Water
Water with either a can or spray mister.

12 Place in Position
Place your pot on a window sill, where it will get a bit of light and, therefore, heat. You can also plant outdoors, which will probably make a more densely packed/bushier plant, as it won't have to strain to reach the light, but you may have to protect the young shoots, as little creatures will love to eat them, too!
Here, you can see the planted pot standing next to the basil.

13 After 1 Week
Once the shoots begin to sprout, they really get a move on! Here they are after only 1 week. You can almost hear them groaning with the effort as they begin to unfurl.

14 After 2 Weeks
They're doing well. It's a miracle! At this stage the immature leaves and tendrils are clearly visible.

15 When to Harvest Pea Shoots
When your pea shoots reach about 6" to 8", pinch out the tendrils with the first set of leaves and the stalk, just above the second leaf (try to pinch out where the node is). New side shoots will grow from here making the plant bushier, and then these can be harvested, too.

In the picture below you can see the front pot has been pinched out and the back one is ready to do.

16 Continue to Harvest
Keep harvesting your pea shoots so that they keep growing tender, new shoots and bulking out. These fabulous plants will probably feed you for several months.
Grow indoors in pots; or grow outdoors in patio tubs, hanging baskets and the ground near to where you can just pinch out the tips as you walk past. Even plant some to grow up your pergola trellis, letting them mature fully for a crop of peas. Try placing a pot on your patio table for a fantastic, summery, nutritious, delicious snack with a difference. Everyone will love you for it!
Enjoy!
Recent Articles
-
They're Coming In Thick and Fast This Weekend!
Apr 12, 26 08:29 AM
Even more discounts to savour, this time for trees, with the original 20% off and now another 15% off. If you're looking for a perfectly placed tree this season either to plant in the ground or in a p… -
Fantastic Pergola Offers
Apr 11, 26 10:44 AM
 Exploring fantastic pergola offers, garden bargains and exclusive voucher codes can mean big savings and there are some great ones this month! Take a look.....
 -
Pergola Posts
Jan 17, 26 09:55 AM
 Let's look at some ideas for your pergola posts - post size, post anchors, using rough sawn or planed timber, and trending pergola paint colours.
 Subscribe To My Blog Posts


Advertising Links
This page may contain advertising links earning a small commission, at no extra cost to you. It is my hope these links will help you to make informed and creative choices.
Love Gardening! Ezine
Join the 'Love Gardening!' Ezine and receive garden and landscaping tips, exclusive voucher codes and updates to the website. More...
Recently Released

Pitched Roof Hexagonal Pergola
Other
Pergola Plans

Free Simple Pergola Plans

Attached Lean-to Pergola

Free Raised Bed Plans

Corner Pergola

Hexagonal Pergola

Asian Pergola

Seated Arbour
"The plans were great, very concise, easy to follow and I couldn't have managed without them!" T.
“Well done for a really useful site!” Mike.
Love the templates for the Rafter Tails! Using Design #5. Thanks so much." Laura.
"I love your website! Your entire site is incredible. I was able to get ideas for my pergola, which looks fantastic." Wayne.
Great service. Now all I have to do is build it! Martin.
"Your plans look amazingly comprehensive. I see you are intending putting the plans for the corner pergola on this fabulous site. Could you please tell me when the corner pergola plans will be available to purchase...yours is the nicest design I have seen!" Michelle.
Plants and Seed Offers
Pergola Kit and Accessories Offers

£340 off


Sales & Offers
Beautiful 'Gainsborough' gazebo
Save £204!

See my 'Fantastic Offers' page for more bargains on pergola kits, tools and all things gardening!